Introduction
Those that own an Elgato Stream Deck swear by it. It can make the many tasks a streamer does simple, automating them down to a single button press. It can also group similar items into folders, making organization easy, as well as providing more “real estate” on the device buttons themselves.
But I’m not here to sell you on a Stream Deck. If you’re reading this post, you are either seriously considering getting one or have already purchased one and you’re looking to get the most out of it. While not all streamers’ setups are alike, I’m going to explain and show how I have mine set up, so anyone can hopefully get the most out of the device they can if your situation is similar to mine. If you have any suggestions on how you think I can set these up better, please let me know. Contact information is at the bottom of this post.
Note: This post will not cover the basics of the Stream Deck and how to set it up – including the software – it assumes you already know how, and have done it.
The Situation(s)
At its most basic, the main tasks a streamer needs to do when they stream are (a) going live, (b) taking a break, and (c) shutting down. There are other simpler, one-off tasks that can and need to be performed while streaming (like playing a specific SFX when something happens on stream), but those are minor compared to these, so they won’t be covered individually. Rather, we’ll cover some of those as part of the overall setup of the three main tasks listed above.
NOTE: I use StreamLabs OBS (SLOBS) for running my streams and will be using those options below. If you use other software (the Stream Deck also supports OBS Studio and XSplit), you will need to adjust to what your software is and which Stream Deck actions you have available. The concepts will be the same.
Going Live
When going live, I typically need to do the following steps, executed sequentially:
- Turn on my lights. I have two Elgato Key Lights, and I need to ensure they are both on.
- Start Snaz. Snaz is a great little utility that provides a few niceties, such as a countdown clock, countup clock, etc. you can add to your scenes as a text element, pointing to a file Snaz writes. I use it so I can show the current time where I live on my Lobby screen.
- Start StreamLabels. This is the utility I use to ensure my Lobby screen shows the appropriate events/viewers for Last Follower, Last Donation and Last Bits.
- Switch to the Starting Up screen
- Start local recording. I record all my streams locally, in addition to what gets sent out to Twitch/Mixer, etc. This is a feature that is turned on inside SLOBS.
- Start the stream/Go Live
- Play the startup song. I typically play an MP3 file when I start my streams – usually about four minutes long. This allows me to take care of last-minute things like getting a drink, a quick trip to the restroom, etc., before the game actually starts.
- Once the song has finished playing, switch to the Main/Live screen, or to the Lobby screen, depending on what I need to talk about before I start playing.
Here is a screenshot of my Going Live setup, showing the specific actions I have my Stream Deck take.

These steps are all pretty straightforward, but there’s some trickery involved around the timing of when things happen when media files are played from the Stream Deck’s Soundboard option. More on that shortly.
The setup of the Elgato Key Lights will not be covered in detail here – just follow the instructions that came with the lights (including installing the software/mobile app and getting them up and running and configured to your liking). When the software is installed, it will add a Control Center section to the Stream Deck, where actions such as On/Off are available, among others.
As far as starting Snaz and StreamLabels, these are done with simple Open actions from the System section. Select the program you want to run, give it a name and you’re done.
The Stream Deck software has direct integration with the major streaming software packages, so it can “see” the scenes you have defined in them so you’ll need to make sure you first have everything already set up in the software you’re using. Simply select the Scene action from the SLOBS section, choose the appropriate Collection and Scene (Startup in my case) from the two dropdowns, give it a name and that’s it.
Starting the local recording is a simple “toggle” action. Select the Record action from the section for SLOBS and choose Start from the dropdown (when using this for stopping the recording, perform these same steps but choose Stop).
Starting (and Stopping) the stream itself is almost identical to starting a local recording, except it’s done using the Stream action under the SLOBS section.
Now that the stream has started, we need to play our startup song. For this, we’ll need to choose the Play Audio action from the Soundboard section. This will allow us to pick a local file (MP3, etc.) to play, as well as set its volume.
The problem with the Soundboard is that it doesn’t stop the Stream Deck from moving on to the next action in the list while the song plays, so in order to make sure it doesn’t do this, we have to add a Delay action to the list immediately before or after the Play Audio action we just added. The Delay has a user-defined length in it in milliseconds (one-thousandth of a second) that will need to match the length of the media file selected for the Soundboard. The Delay will cause the actions to wait until the defined timer expires before moving on to the next action in the list. This allows us to “pause” our actions until after the song finishes. This will be critical in the Taking a Break section below where we have to play multiple media files in succession. For calculating the correct value to put here, use the following formula:
Delay = (Minutes * 60 * 1000) + (Seconds * 1000)
So, for example, if we have an audio file that is 3m35s in length, we would enter 215000 ((3 * 60 * 1000) + (35 * 1000)). Depending on how much fade in/out the file you choose has, you may need to adjust this up or down appropriately.
I also add additional Delay actions on both sides of the Play Audio action just to make sure everything transitions properly. These are not necessary.
And finally, we need to switch to the Main scene to get the actual stream started. This is the same as the Startup option above, but pick your main scene.
Taking a Break
When I take a break, I like to have a looping video of falling snow play in the background while MP3s play. Typically my breaks lasts about ten minutes, or a few minutes longer on weekends, as my streams on weekends cross over lunch, so I take a few extra minutes for food. These are the basic steps:
- Switch to the On Break screen.
- Play the break song(s).
- Switch to the Main or Lobby screen, whichever is appropriate.
This one is way more complicated than it sounds, and it’s because of the way the Stream Deck works in regards to playing media files, as discussed in the Going Live section above. But there’s even more to it than that. Some streamers will display a “crawler” at the bottom of the screen to give attribution to the artist that performed the song (and in fact, some require it to use it for free). While SLOBS can display static or scrolling text on the screen, there’s no way for the Soundboard action to send information to SLOBS to do it (via writing the information to a text file), so you have to. There are audio players (through plugins, such as Foobar2000) that can write the artist and title of a song to a text file, but the Stream Deck software does not give you enough control via the Multimedia action under System to play a specific song by name from the Stream Deck – it only does Next/Previous, Pause/Play and Stop.
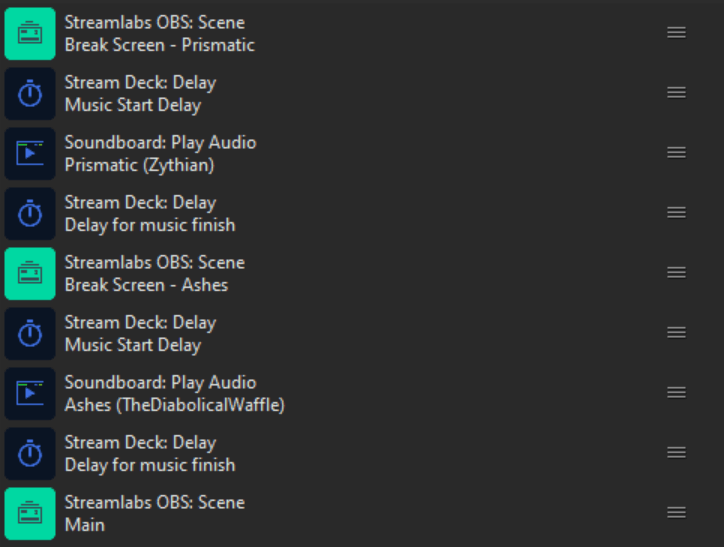
So how do we do all this? Without a custom Stream Deck plugin (for which there is an API available to do), we have to do it all through SLOBS and standard Stream Deck actions. We essentially have to “fake” it to make it look like the way we want it, and it takes several steps. Here is a screen capture of the Stream Deck side of things, and we’ll cover that first.
Note: If you do not have a “crawl” in your scenes, you can skip that section.
There’s really nothing new here we didn’t already cover before in Going Live, but here are the steps:
Stream Deck
Create a Multi Action action from the Stream Deck section and give it a name, such as “Break”.
Add a Scene action from the SLOBS section, choose the appropriate Collection and Scene (Break in my case) from the two dropdowns, and give it a name.
Add a Play Audio action from the Soundboard section, select the file to play, and set the name as well as the volume.
Add a Delay action and set its length in milliseconds as described in the Going Live section, using the described formula.
Repeat the three previous steps for each additional song.
Add a Scene action from the SLOBS section, choose the appropriate Collection and Scene (either to return to your main scene or to a lobby).
SLOBS
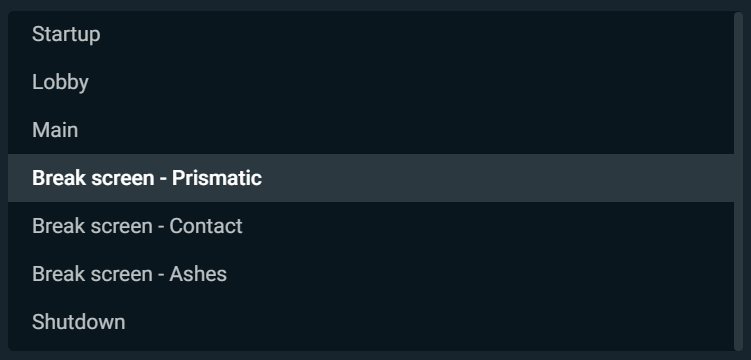
Now we have to set up the scene(s). Part of the trick here is that we have to duplicate the Break screen the number of times equal to the number of songs to be played during the break. This is easy enough to do in SLOBS by right-clicking the scene, selecting Duplicate and giving the duplicated scene a new name (I would suggest putting the name of the song there to keep them straight). This is what you should wind up with (using mine as an example):
For each scene that has a crawl, add a new Text source to it, and place it on the scene where you want it – set the font, style, color, etc. In the Text field on the dialog, enter the text you want while the song is playing – mine is typically the name in quotes followed with “by” and the artist name.
Now, in order to get the crawl effect, you need to right-click on the Text source just added and add a new Scroll filter for it. On the Scroll properties dialog, you can set the horizontal and vertical scrolling speed as well as the width and whether to limit it. You can tinker with these to get them to your liking, but I have my Horizontal Speed set at 85 and Vertical Speed at 0. The text and scroll setup values should be set to the same for each break scene so you have a consistent look.
Repeat the previous three steps for each additional song.
Once you have all the scenes set up the way you want them, now we have to concern ourselves with the transitions between them. This will be critical if you have existing transitions between all of your other scenes. These break screen scenes should be treated as a “set”, and as such, should not have a “visible” transition between them. You want the transition to not be noticeable to the viewers. To set up a proper transition, on the Scenes section of SLOBS, click the gear icon and on the resulting Scene Transitions dialog, select the Transitions tab at the top. This will show the existing list of transitions you have, if any. Click on Add Transition, and in the resulting dialog, select the Type as Fade, the Duration as 0, and give it a name.
Now, we have to tie the break scene transitions together so the same transition is used between all the break scenes. We do this using a Connection. On the Scene Transitions dialog we used before, select the Connections tab at the top. Click on Add Connection, the select the Beginning and Ending scenes from the steps above, as well as the Scene Transition you created above.
That should be it. Now, when you go on break, all you have to do is hit one button and the Stream Deck will do all the audio playing and scene switching to properly run your break for you. This is easy enough to test while not streaming to validate the timing is correct, transitions happen the way they are intended, etc. The only problem with this setup is you have to do a lot of work if you want to change your break songs, or even more if you want to add another song to an existing set for the break. But this should be simple following the above directions.
Shutting Down
When shutting down, I typically just reverse the Going Live steps. By the time you get here, everything will have been described for getting it set up – there is nothing new here not covered above.
- Switch to the Shutting Down screen.
- Start the shutdown song. I typically play an MP3 file, much shorter than the startup. While I don’t want to abruptly end the stream, I also know people will typically bail when I start this (or go watch the other streamer I’ve hosted or raided), so I want this short(er). As mentioned above, we’ll need to add a System Delay here so the next step doesn’t execute until the media file has finished playing.
- Stop local recording.
- Stop the stream.
- Turn off the lights.

Create a Multi Action action from the Stream Deck section and give it a name, such as “Shutdown”.
Add a Scene action from the SLOBS section, choose the appropriate Collection and Scene (Shutdown in my case) from the two dropdowns, and give it a name.
Add a Play Audio action from the Soundboard section, select the file to play, and set the name as well as the volume.
Add a Delay action and set its length in milliseconds as described in the Going Live section, using the described formula.
Add a Record action from the SLOBS section and choose Stop Recording from the dropdown.
Add a Stream action from the SLOBS section and choose Stop from the dropdown.
Recap
This is now I have my stream set up for the basic actions a streamer typically takes – starting, taking a break, and shutting down. While it may seem complicated at first, hopefully by the time you’ve gotten here it will make sense and will have been easy to follow. The Stream Deck is a very flexible device, and the limit is really your imagination.
Questions? Comments?
We can always improve, so if you have any questions about what was covered in this post, or any suggestions on how I can improve it, please let me know! You can either leave a comment below, email me at theicemancometh360@gmail.com, or join us at The Igloo on Discord at https://discord.gg/cjQJVB7.

I am confused I thought there was a stream deck profile that was made available for download? Did I misunderstand, or miss the link for the download?
LikeLike
No, this was not intended to be any kind of profile or download. Just information and possible solutions on how to set things up if anyone is in the same situation as I was.
LikeLike